Getting started with ItemPick
This tutorial shows how to set up the rc_visard to start using the ItemPick module and guides the reader to the computation of the first grasps.
Before we start
In order to go through this tutorial, the following prerequisites should be met:
The rc_visard is properly configured:
- The rc_visard is running the latest firmware (version 26.04) and the rc_visard’s license includes the ItemPick module. This can be verified on the page of the Web GUI.
One or more workpieces are in the field of view of the camera. They should meet the following requisites:
- The workpiece surface, shape and weight are suitable for picking by suction (i.e. the vacuum generated by the gripper system together with the size of the suction cup generate a suction force large enough to lift and move the workpiece).
- The workpiece surface appears in the depth image. This can be verified by placing the workpiece in front of the rc_visard and checking the Web GUI’s Depth image page. If the workpiece presents holes or low confidence regions (i.e. average gray pixels in the Confidence image), one can follow the Tuning of image parameters tutorial.
- The workpiece has at least the minimum dimensions required by the ItemPick module. This threshold is set to 300 pixels in the depth image, which approximately correspond to an object of size 0.04 m x 0.04 m at a distance of 1.2 m from the sensor.
Setting up the scene
We recommend to mount the rc_visard on a tripod or a static support as explained in the rc_visard’s Mechanical interface description.
Alternatively, the rc_visard can also be mounted on the end-effector of a robot, but the integration with the robot is not included in this tutorial (therefore, no hand-eye calibration is required to complete the tutorial).
Note
The mounting should be stable such that the sensor remains static while ItemPick acquires data.
The workpieces to be grasped should be placed in the field of view of the rc_visard. The optimal distance to the objects depends on the rc_visard model, as shown in the table below.
| Minimum distance | Maximum distance | |
|---|---|---|
| rc_visard 160m/c | 0.5 m | 1.3 m |
| rc_visard 65m/c | 0.2 m | 1.0 m |
Since the depth accuracy declines quadratically with an object’s distance from the sensor, the rc_visard should be placed as close to the objects as possible.
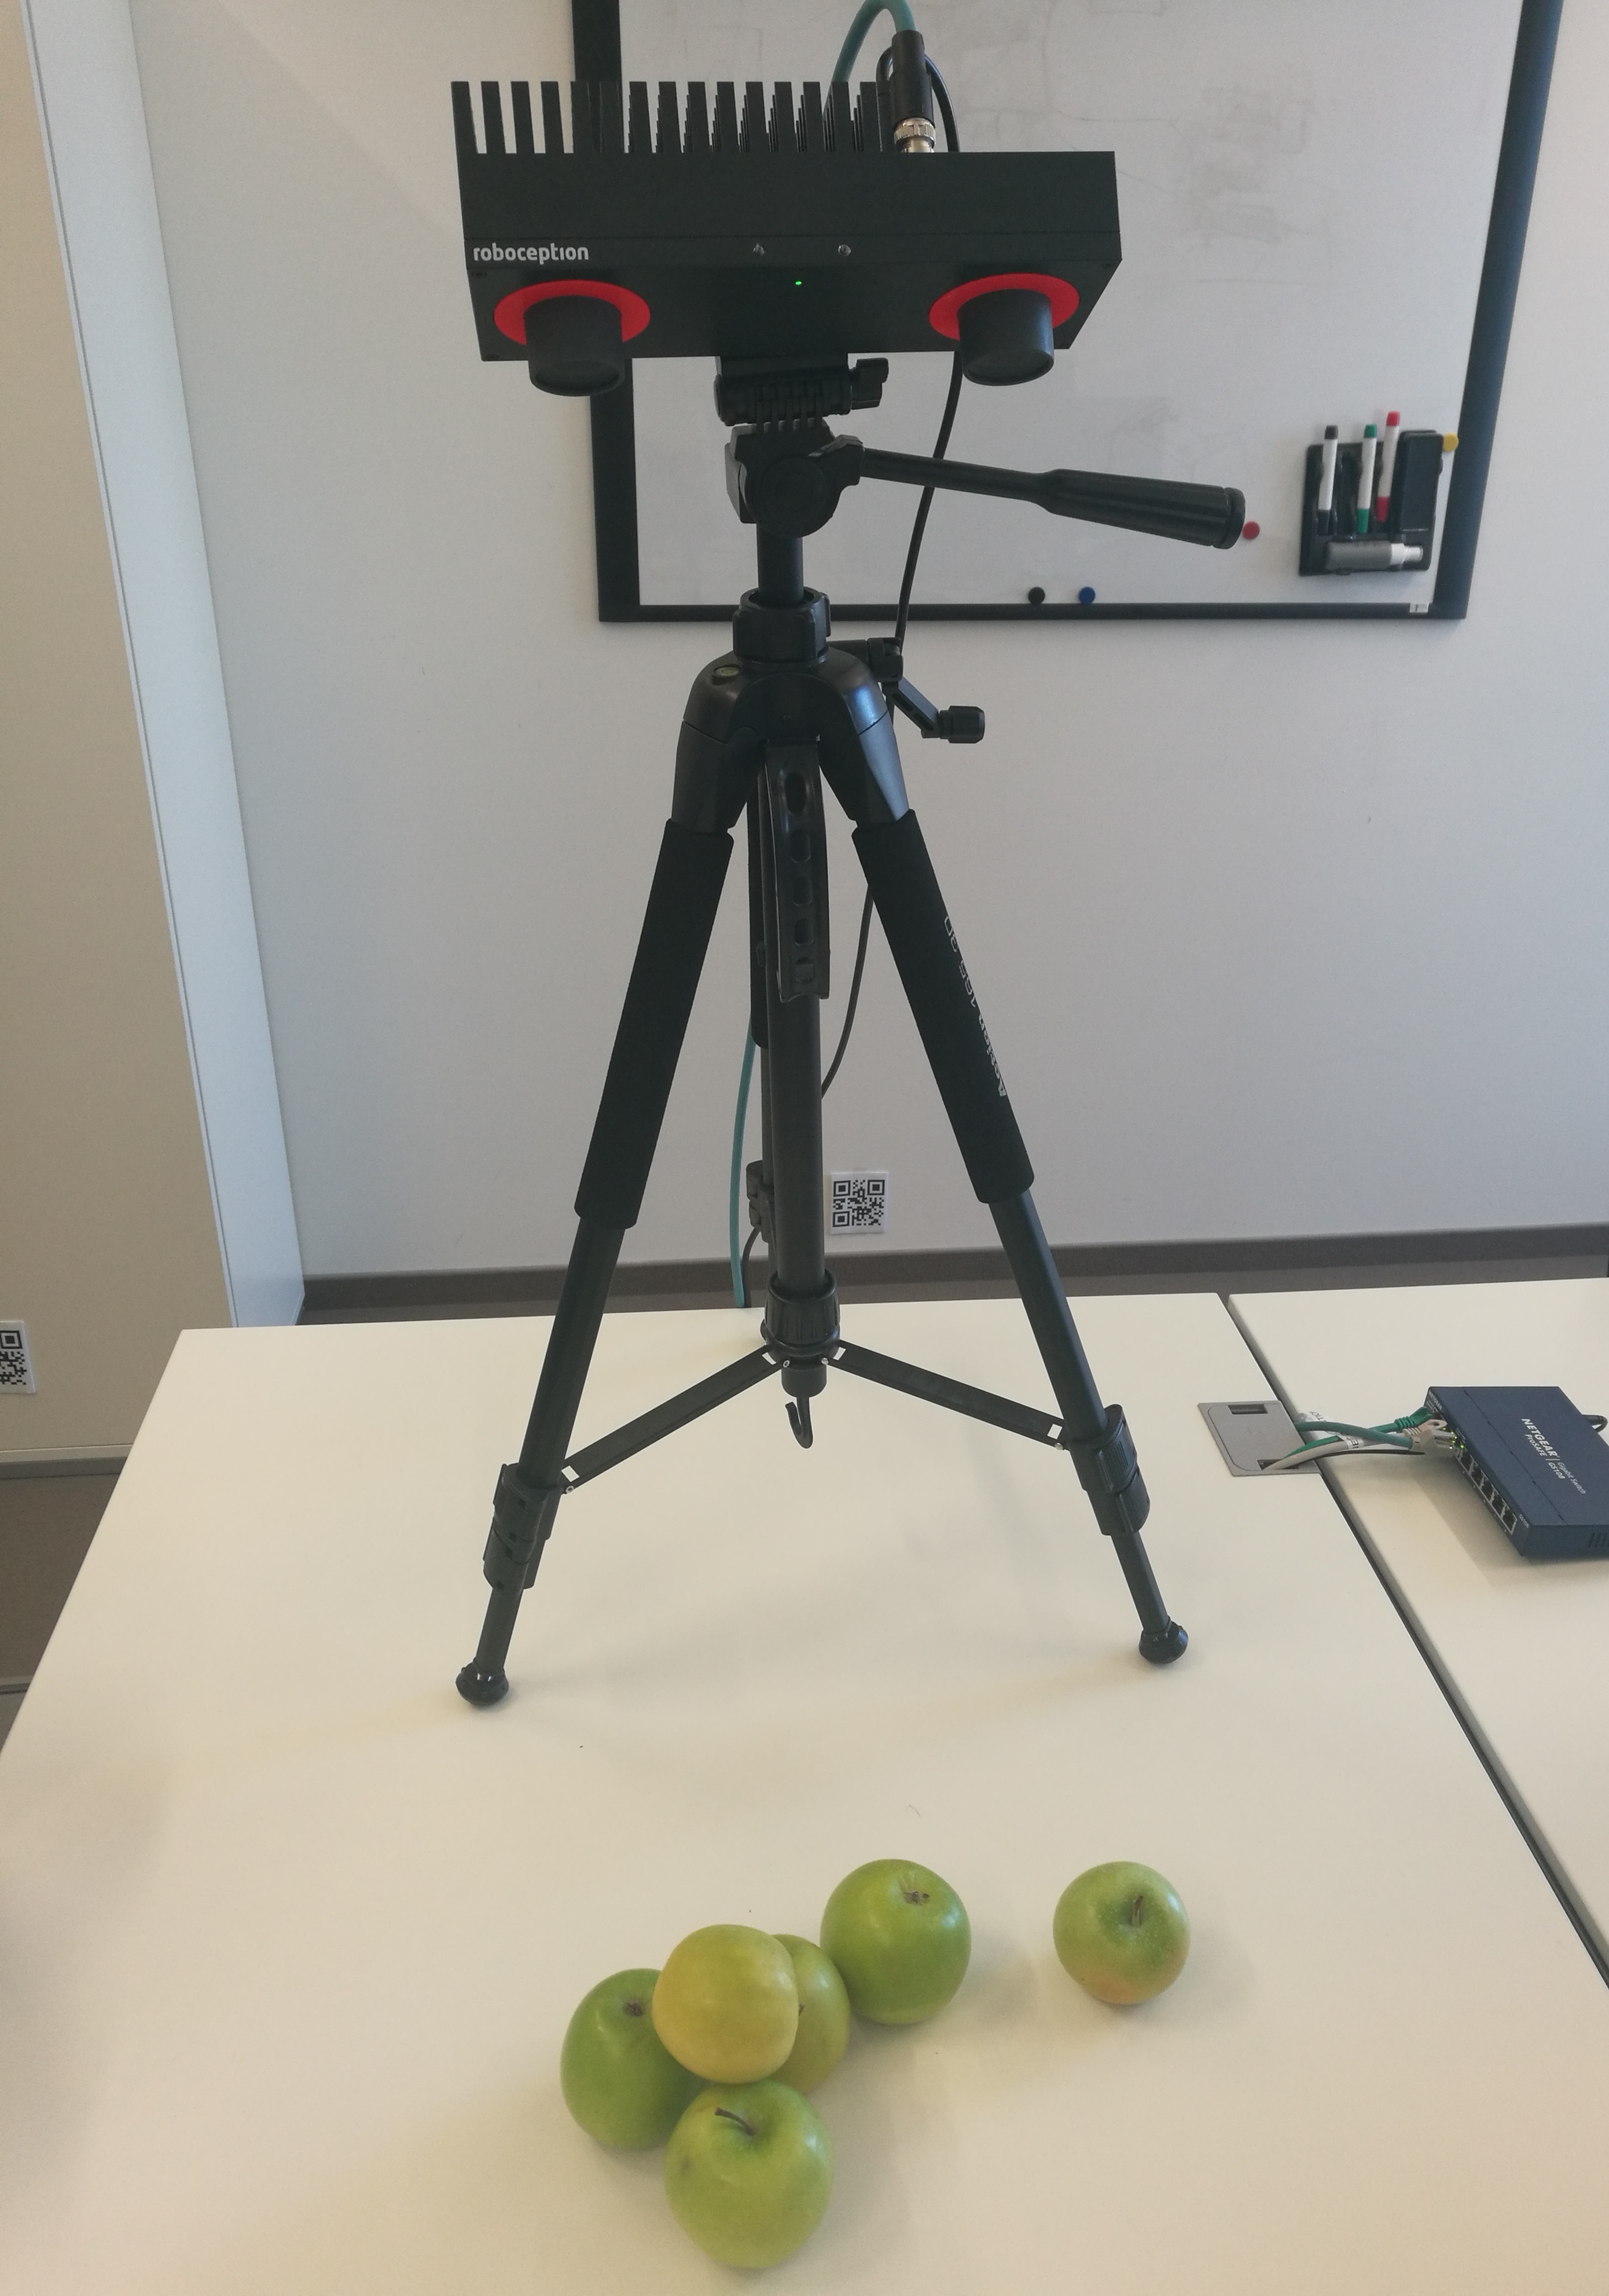
Fig. 19 Sample setup. The rc_visard 160 is mounted on a tripod approximately 0.7 m away from the objects.
Configuring image parameters
Once the scene has been set up, we recommend to check the Web GUI’s Depth image page to verify that the images are well-exposed and the depth image is dense with no holes on the workpieces. The tutorial Tuning of image parameters covers all required steps to get the best quality for stereo and depth images. The depth image density can also be increased by adding the rc_randomdot projector to the rc_visard.
ItemPick provides its best results when the depth image quality is set to High or Full. The Static mode might be beneficial in static scenes, but it increases the data acquisition time.
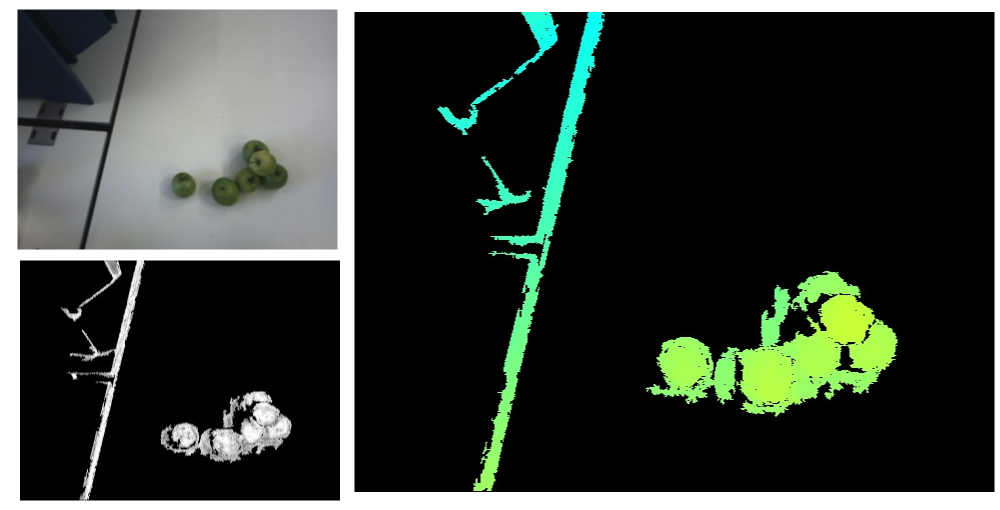
Fig. 20 Sample images from the setup shown above: left image (top left), confidence image (bottom left), and depth image (right).
Computing the first grasps
The compute_grasps service of the ItemPick module triggers the computation of suction grasps on the objects in the scene.
This section shows how to place a compute_grasps request to ItemPick
using the rc_visard’s REST-API interface. This can be done in Swagger UI,
in command lines or scripts using curl, and programmatically
using a client library (e.g. from the robot controller).
In this tutorial we focus on the first two options.
Note
The compute_grasp service can also be triggered in the Try Out section
of the Web GUI’s page.
The required arguments are pre-set with default values,
therefore the service can be directly called by hitting the Detect Grasp Points button.
In the below examples, the service will be triggered with the minimum set of required arguments. For this reason, the results might be sub-optimal (e.g. multiple grasps on a single workpiece, or grasps on unwanted objects).
The images in the top section of the Web GUI’s page show the results of the last successful request to ItemPick.
To trigger the compute_grasp service via the REST-API, one needs to send
a PUT request to the URL
http://<rc-visard-ip>/api/v2/pipelines/0/nodes/rc_itempick/services/compute_grasp,
where <rc-visard-ip> should be replaced by the actual IP of the rc_visard.
The PUT body should include the following data, in JSON:
{
  "args": {
    "pose_frame": "camera",
    "suction_surface_length": 0.02,
    "suction_surface_width": 0.02
  }
}
The Swagger UI can be reached at
http://<rc-visard-ip>/api, where<rc-visard-ip>is the actual IP of the rc_visard.Under pipeline nodes, select
PUT /pipelines/{pipeline}/nodes/{node}/services/{service}The following values are required to fill the request to the REST-API:
node
rc_itempickservice
compute_grasps- service args
{
  "args": {
    "pose_frame": "camera",
    "suction_surface_length": 0.02,
    "suction_surface_width": 0.02
  }
}
The following command assumes that the variable RC_VISARD_IP is set to the actual IP of the
rc_visard (e.g. RC_VISARD_IP=10.0.2.90).
curl -X PUT "http://$RC_VISARD_IP/api/v2/pipelines/0/nodes/rc_itempick/services/compute_grasps" -H  "accept: application/json" -H  "Content-Type: application/json" -d \
"{ \
    \"args\": { \
        \"pose_frame\": \"camera\", \
        \"suction_surface_length\": 0.02, \
        \"suction_surface_width\": 0.02 \
    } \
}"
The following command assumes that the variable RC_VISARD_IP is set to the actual IP of the
rc_visard (e.g. set RC_VISARD_IP=10.0.2.90) and the curl command is in the path.
curl.exe -X PUT "http://%RC_VISARD_IP%/api/v2/pipelines/0/nodes/rc_itempick/services/compute_grasps" -H  "accept: application/json" -H  "Content-Type: application/json" -d ^
"{ ^
    \"args\": { ^
        \"pose_frame\": \"camera\", ^
        \"suction_surface_length\": 0.02, ^
        \"suction_surface_width\": 0.02 ^
    } ^
}"
The following command assumes that the variable RC_VISARD_IP is set to the actual IP of the
rc_visard (e.g. $RC_VISARD_IP="10.0.2.90").
Invoke-RestMethod "http://$RC_VISARD_IP/api/v2/pipelines/0/nodes/rc_itempick/services/compute_grasps" -ContentType 'application/json' -Method Put -Body '
{
  "args": {
    "pose_frame": "camera",
    "suction_surface_length": 0.02,
    "suction_surface_width": 0.02
  }
}' | ConvertTo-Json -Depth 6
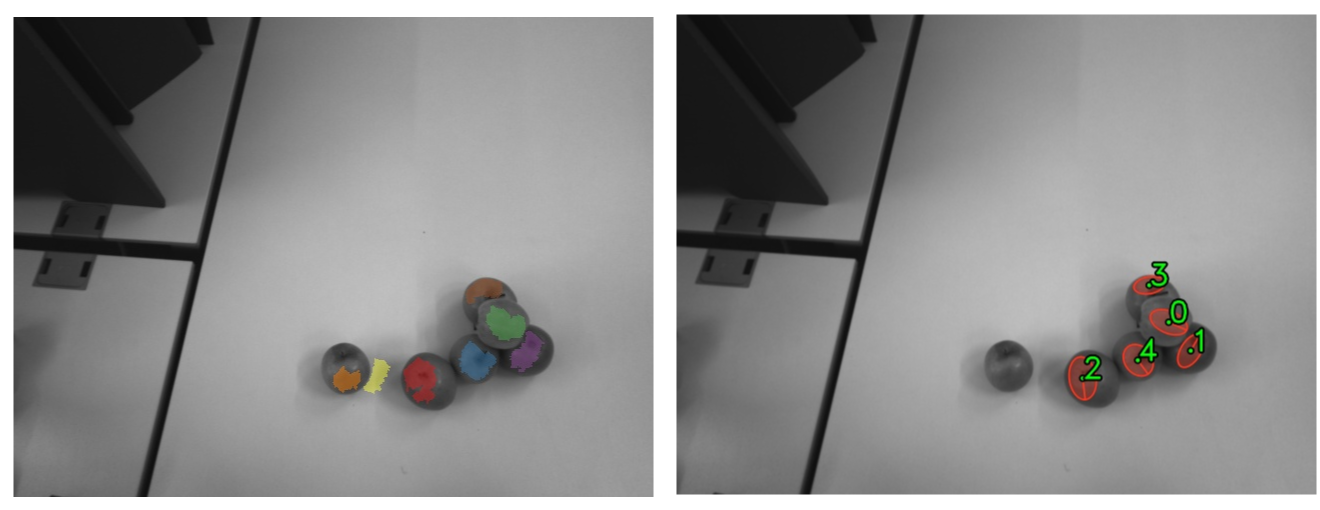
Fig. 21 Sample results on the scene shown above: surfaces image on the left and computed grasps on the
right (including the available suction surface). By default, maximally 5 grasps are returned
by the compute_grasps service. The sorting of the grasps takes into account the gravity
vector, so that objects on top of a pile are grasped first.