Configuring a load carrier
This tutorial shows how to configure a load carrier using the LoadCarrierDB database module.
Configured load carriers are global and available in all detection modules (LoadCarrier, ItemPick, BoxPick, SilhouetteMatch and CADMatch), for computing grasps or detecting objects in bin-picking applications. Specifically for the LoadCarrier module, this tutorial also describes how to detect a load carrier in the scene.
Before we start
In order to go through this tutorial, the following prerequisites should be met:
The rc_visard is properly configured:
- The rc_visard is running the latest firmware (version 26.04) and the rc_visard’s license includes the LoadCarrier module. This can be verified on the page of the Web GUI.
A load carrier is available and placed in the field of view of the camera:
- The picture below shows some sample load carriers that can be used for detection. The upper limit for the load carrier dimensions is 2.0 m x 2.0 m x 2.0 m.
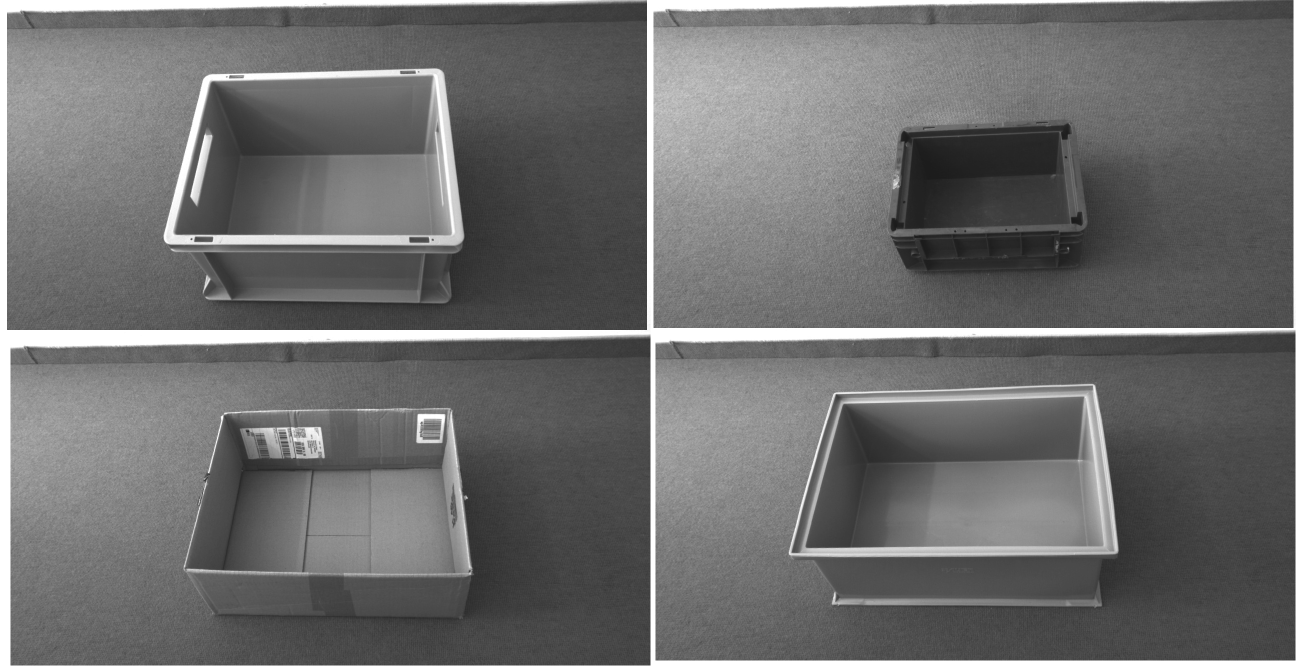
Fig. 15 Different models of load carriers
Add a new load carrier
The easiest and recommended way to configure a load carrier is via the page of the Web GUI. The Load Carriers section on this page lists all defined load carriers and allows to edit and remove them.
As an alternative, we also introduce the programmatic interface of the LoadCarrierDB database module, which offers three services for managing load carriers via the rc_visard’s REST-API interface:
In this section we show how to configure two different types of load carriers including some code examples.
Load carriers with a solid rim
The first model is the load carrier at the top left corner of Fig. 15. It will be configured with the unique ID my-load-carrier1. The manufacturer’s website reports the following dimensions:
- Outer dimensions: 40 x 30 x 22 cm
- Inner dimensions: 37 x 27 x 21.5 cm
These values can be directly entered in the dialog that opens when clicking on “+ Add a new Load Carrier” on the Web GUI’s page, with the only difference that the values need to be converted to meters.
REST-API request for configuring my-load-carrier1
To trigger the set_load_carrier service via the REST-API for my-load-carrier1,
one needs to send a PUT request to the URL
http://<rc-visard-ip>/api/v2/nodes/rc_load_carrier_db/services/set_load_carrier,
where <rc-visard-ip> should be replaced by the actual IP of the rc_visard.
The PUT body should include the following data, in JSON:
{
  "args": {
    "load_carrier": {
      "id": "my-load-carrier1",
      "outer_dimensions": {
        "x": 0.4,
        "y": 0.3,
        "z": 0.22
      },
      "inner_dimensions": {
        "x": 0.37,
        "y": 0.27,
        "z": 0.215
      }
    }
  }
}
The Swagger UI can be reached at
http://<rc-visard-ip>/api, where<rc-visard-ip>is the actual IP of the rc_visard.Under global nodes, select
PUT /nodes/{node}/services/{service}The following values are required to fill the request to the REST-API:
node
rc_load_carrier_dbservice
set_load_carrier- service args
{
  "args": {
    "load_carrier": {
      "id": "my-load-carrier1",
      "outer_dimensions": {
        "x": 0.4,
        "y": 0.3,
        "z": 0.22
      },
      "inner_dimensions": {
        "x": 0.37,
        "y": 0.27,
        "z": 0.215
      }
    }
  }
}
The following command assumes that the variable RC_VISARD_IP is set to the actual IP of the
rc_visard (e.g. RC_VISARD_IP=10.0.2.90).
curl -X PUT "http://$RC_VISARD_IP/api/v2/nodes/rc_load_carrier_db/services/set_load_carrier" -H  "accept: application/json" -H  "Content-Type: application/json" -d \
"{ \
    \"args\": { \
        \"load_carrier\": { \
            \"id\": \"my-load-carrier1\", \
            \"outer_dimensions\": { \
                \"x\": 0.4, \
                \"y\": 0.3, \
                \"z\": 0.22 \
            }, \
            \"inner_dimensions\": { \
                \"x\": 0.37, \
                \"y\": 0.27, \
                \"z\": 0.215 \
            } \
        } \
    } \
}"
The following command assumes that the variable RC_VISARD_IP is set to the actual IP of the
rc_visard (e.g. set RC_VISARD_IP=10.0.2.90) and the curl command is in the path.
curl.exe -X PUT "http://%RC_VISARD_IP%/api/v2/nodes/rc_load_carrier_db/services/set_load_carrier" -H  "accept: application/json" -H  "Content-Type: application/json" -d ^
"{ ^
    \"args\": { ^
        \"load_carrier\": { ^
            \"id\": \"my-load-carrier1\", ^
            \"outer_dimensions\": { ^
                \"x\": 0.4, ^
                \"y\": 0.3, ^
                \"z\": 0.22 ^
            }, ^
            \"inner_dimensions\": { ^
                \"x\": 0.37, ^
                \"y\": 0.27, ^
                \"z\": 0.215 ^
            } ^
        } ^
    } ^
}"
The following command assumes that the variable RC_VISARD_IP is set to the actual IP of the
rc_visard (e.g. $RC_VISARD_IP="10.0.2.90").
Invoke-RestMethod "http://$RC_VISARD_IP/api/v2/nodes/rc_load_carrier_db/services/set_load_carrier" -ContentType 'application/json' -Method Put -Body '
{
  "args": {
    "load_carrier": {
      "id": "my-load-carrier1",
      "outer_dimensions": {
        "x": 0.4,
        "y": 0.3,
        "z": 0.22
      },
      "inner_dimensions": {
        "x": 0.37,
        "y": 0.27,
        "z": 0.215
      }
    }
  }
}' | ConvertTo-Json -Depth 6
Load carriers with a stepped rim
The second model is the load carrier at the top right corner of Fig. 15. This load carrier will be configured with the unique ID my-load-carrier2. The manufacturer’s website reports the following dimensions:
- Outer dimensions: 30 x 20 x 14.7 cm
- Inner dimensions: 24.3 x 16.2 x 12.95 cm
In this model, the top load carrier rim is thinner than the actual difference between outer and inner dimensions. For this reason, we additionally need to specify the thickness values, which is approximately 0.013 m in both directions. The rim step height (the height of the step between the outer and the inner part of the rim) is 0.02 m.
If not specified, the rim thickness is automatically computed from the difference between outer and inner dimensions, as it was the case for my-load-carrier1.
REST-API request for configuring my-load-carrier2
To trigger the set_load_carrier service via the REST-API for my-load-carrier2,
one needs to send a PUT request to the URL
http://<rc-visard-ip>/api/v2/nodes/rc_load_carrier_db/services/set_load_carrier,
where <rc-visard-ip> should be replaced by the actual IP of the rc_visard.
The PUT body should include the following data, in JSON:
{
  "args": {
    "load_carrier": {
      "id": "my-load-carrier2",
      "outer_dimensions": {
        "x": 0.3,
        "y": 0.2,
        "z": 0.147
      },
      "inner_dimensions": {
        "x": 0.243,
        "y": 0.162,
        "z": 0.1295
      },
      "rim_thickness": {
        "x": 0.013,
        "y": 0.013
      },
      "rim_step_height": 0.02
    }
  }
}
The Swagger UI can be reached at
http://<rc-visard-ip>/api, where<rc-visard-ip>is the actual IP of the rc_visard.Under global nodes, select
PUT /nodes/{node}/services/{service}The following values are required to fill the request to the REST-API:
node
rc_load_carrier_dbservice
set_load_carrier- service args
{
  "args": {
    "load_carrier": {
      "id": "my-load-carrier2",
      "outer_dimensions": {
        "x": 0.3,
        "y": 0.2,
        "z": 0.147
      },
      "inner_dimensions": {
        "x": 0.243,
        "y": 0.162,
        "z": 0.1295
      },
      "rim_thickness": {
        "x": 0.013,
        "y": 0.013
      },
      "rim_step_height": 0.02
    }
  }
}
The following command assumes that the variable RC_VISARD_IP is set to the actual IP of the
rc_visard (e.g. RC_VISARD_IP=10.0.2.90).
curl -X PUT "http://$RC_VISARD_IP/api/v2/nodes/rc_load_carrier_db/services/set_load_carrier" -H  "accept: application/json" -H  "Content-Type: application/json" -d \
"{ \
    \"args\": { \
        \"load_carrier\": { \
            \"id\": \"my-load-carrier2\", \
            \"outer_dimensions\": { \
                \"x\": 0.3, \
                \"y\": 0.2, \
                \"z\": 0.147 \
            }, \
            \"inner_dimensions\": { \
                \"x\": 0.243, \
                \"y\": 0.162, \
                \"z\": 0.1295 \
            }, \
            \"rim_thickness\": { \
                \"x\": 0.013, \
                \"y\": 0.013 \
            }, \
            \"rim_step_height\": 0.02 \
        } \
    } \
}"
The following command assumes that the variable RC_VISARD_IP is set to the actual IP of the
rc_visard (e.g. set RC_VISARD_IP=10.0.2.90) and the curl command is in the path.
curl.exe -X PUT "http://%RC_VISARD_IP%/api/v2/nodes/rc_load_carrier_db/services/set_load_carrier" -H  "accept: application/json" -H  "Content-Type: application/json" -d ^
"{ ^
    \"args\": { ^
        \"load_carrier\": { ^
            \"id\": \"my-load-carrier2\", ^
            \"outer_dimensions\": { ^
                \"x\": 0.3, ^
                \"y\": 0.2, ^
                \"z\": 0.147 ^
            }, ^
            \"inner_dimensions\": { ^
                \"x\": 0.243, ^
                \"y\": 0.162, ^
                \"z\": 0.1295 ^
            }, ^
            \"rim_thickness\": { ^
                \"x\": 0.013, ^
                \"y\": 0.013 ^
            }, ^
            \"rim_step_height\": 0.02 ^
        } ^
    } ^
}"
The following command assumes that the variable RC_VISARD_IP is set to the actual IP of the
rc_visard (e.g. $RC_VISARD_IP="10.0.2.90").
Invoke-RestMethod "http://$RC_VISARD_IP/api/v2/nodes/rc_load_carrier_db/services/set_load_carrier" -ContentType 'application/json' -Method Put -Body '
{
  "args": {
    "load_carrier": {
      "id": "my-load-carrier2",
      "outer_dimensions": {
        "x": 0.3,
        "y": 0.2,
        "z": 0.147
      },
      "inner_dimensions": {
        "x": 0.243,
        "y": 0.162,
        "z": 0.1295
      },
      "rim_thickness": {
        "x": 0.013,
        "y": 0.013
      },
      "rim_step_height": 0.02
    }
  }
}' | ConvertTo-Json -Depth 6
Note
Making a set_load_carrier request with an existing load_carrier_id will overwrite
the load carrier model previously stored.
Setting the exact pose or an orientation prior of a load carrier
Users can specify an orientation prior, or the exact pose of the load carrier. Once users set the exact pose of the load carrier, any detection module will not estimate the position of the load carrier anymore. Instead, the load carrier is assumed to be at the specified position. Exact poses are helpful in applications when the load carrier pose does not change. Setting the exact pose lowers latency and helps when working with load carriers that are hard to detect, for example transparent load carriers or load carriers with a very thin rim. The orientation prior should be used when the load carrier is not placed horizontally, to facilitate the detection of the load carrier. Incorporating the exact pose of the load carrier is discussed below. Suppose the load carrier is set exactly at the following position:
- Translation: 0 x 0 x 50.0 cm
- Rotation (as quaternion): 0, 0, 0, 1
These values can be directly entered in the dialog that opens when clicking on “+ Add a new Load Carrier” on the Web GUI’s page, after activating “Set Pose” and choosing “Exact Pose” as pose type. Furthermore, the values can be communicated programmatically through the REST-API, as outlined below:
REST-API request for configuring the pose of my-load-carrier1
To trigger the set_load_carrier service via the REST-API for my-load-carrier1,
one needs to send a PUT request to the URL
http://<rc-visard-ip>/api/v2/nodes/rc_load_carrier_db/services/set_load_carrier,
where <rc-visard-ip> should be replaced by the actual IP of the rc_visard.
The PUT body should include the following data, in JSON:
{
  "args": {
    "load_carrier": {
      "id": "my-load-carrier1",
      "outer_dimensions": {
        "x": 0.4,
        "y": 0.3,
        "z": 0.22
      },
      "inner_dimensions": {
        "x": 0.37,
        "y": 0.27,
        "z": 0.215
      },
      "pose_frame": "camera",
      "pose": {
        "position": {
          "x": 0,
          "y": 0,
          "z": 0.50
        },
        "orientation": {
          "x": 0,
          "y": 0,
          "z": 0,
          "w": 1
        }
      },
      "pose_type": "EXACT_POSE"
    }
  }
}
The Swagger UI can be reached at
http://<rc-visard-ip>/api, where<rc-visard-ip>is the actual IP of the rc_visard.Under global nodes, select
PUT /nodes/{node}/services/{service}The following values are required to fill the request to the REST-API:
node
rc_load_carrier_dbservice
set_load_carrier- service args
{
  "args": {
    "load_carrier": {
      "id": "my-load-carrier1",
      "outer_dimensions": {
        "x": 0.4,
        "y": 0.3,
        "z": 0.22
      },
      "inner_dimensions": {
        "x": 0.37,
        "y": 0.27,
        "z": 0.215
      },
      "pose_frame": "camera",
      "pose": {
        "position": {
          "x": 0,
          "y": 0,
          "z": 0.50
        },
        "orientation": {
          "x": 0,
          "y": 0,
          "z": 0,
          "w": 1
        }
      },
      "pose_type": "EXACT_POSE"
    }
  }
}
The following command assumes that the variable RC_VISARD_IP is set to the actual IP of the
rc_visard (e.g. RC_VISARD_IP=10.0.2.90).
curl -X PUT "http://$RC_VISARD_IP/api/v2/nodes/rc_load_carrier_db/services/set_load_carrier" -H  "accept: application/json" -H  "Content-Type: application/json" -d \
"{ \
    \"args\": { \
        \"load_carrier\": { \
            \"id\": \"my-load-carrier1\", \
            \"outer_dimensions\": { \
                \"x\": 0.4, \
                \"y\": 0.3, \
                \"z\": 0.22 \
            }, \
            \"inner_dimensions\": { \
                \"x\": 0.37, \
                \"y\": 0.27, \
                \"z\": 0.215 \
            }, \
            \"pose_frame\": \"camera\", \
            \"pose\": { \
              \"position\": { \
                \"x\": 0, \
                \"y\": 0, \
                \"z\": 0.50 \
              }, \
              \"orientation\": { \
                \"x\": 0, \
                \"y\": 0, \
                \"z\": 0, \
                \"w\": 1 \
              } \
            }, \
            \"pose_type\": \"EXACT_POSE\" \
        } \
    } \
}"
The following command assumes that the variable RC_VISARD_IP is set to the actual IP of the
rc_visard (e.g. set RC_VISARD_IP=10.0.2.90) and the curl command is in the path.
curl.exe -X PUT "http://%RC_VISARD_IP%/api/v2/nodes/rc_load_carrier_db/services/set_load_carrier" -H  "accept: application/json" -H  "Content-Type: application/json" -d ^
"{ ^
    \"args\": { ^
        \"load_carrier\": { ^
            \"id\": \"my-load-carrier1\", ^
            \"outer_dimensions\": { ^
                \"x\": 0.4, ^
                \"y\": 0.3, ^
                \"z\": 0.22 ^
            }, ^
            \"inner_dimensions\": { ^
                \"x\": 0.37, ^
                \"y\": 0.27, ^
                \"z\": 0.215 ^
            }, ^
            \"pose_frame\": \"camera\",^
            \"pose\": {^
              \"position\": {^
                \"x\": 0,^
                \"y\": 0,^
                \"z\": 0.50^
              },^
              \"orientation\": {^
                \"x\": 0,^
                \"y\": 0,^
                \"z\": 0,^
                \"w\": 1 ^
              }^
            },^
            \"pose_type\": \"EXACT_POSE\"^
        } ^
    } ^
}"
The following command assumes that the variable RC_VISARD_IP is set to the actual IP of the
rc_visard (e.g. $RC_VISARD_IP="10.0.2.90").
Invoke-RestMethod "http://$RC_VISARD_IP/api/v2/nodes/rc_load_carrier_db/services/set_load_carrier" -ContentType 'application/json' -Method Put -Body '
{
  "args": {
    "load_carrier": {
      "id": "my-load-carrier1",
      "outer_dimensions": {
        "x": 0.4,
        "y": 0.3,
        "z": 0.22
      },
      "inner_dimensions": {
        "x": 0.37,
        "y": 0.27,
        "z": 0.215
      },
      "pose_frame": "camera",
      "pose": {
        "position": {
          "x": 0,
          "y": 0,
          "z": 0.50
        },
        "orientation": {
          "x": 0,
          "y": 0,
          "z": 0,
          "w": 1
        }
      },
      "pose_type": "EXACT_POSE"
    }
  }
}' | ConvertTo-Json -Depth 6
Instead of setting the exact pose, the prior orientation can be set by replacing the EXACT_POSE pose_type by ORIENTATION_PRIOR. Furthermore, as the orientation prior does not require the translation of the load carrier, the position field can be deleted.
Note
Making a set_load_carrier request with an existing load_carrier_id will overwrite
the load carrier model previously stored.
Detecting the load carrier
After the load carrier has been configured, it can be detected using the LoadCarrier module. The Web GUI’s page offers a Try Out section for this purpose. One simply needs to specify the respective load carrier ID and hit the Detect Load Carrier button.
Note
In the Web GUI’s Try Out section it is also possible to add a new load carrier or edit existing ones in the Load Carrier drop-down menu. This option is also available in the Try Out section of all detection modules.
As for the REST-API, the LoadCarrier module offers a detect_load_carriers service to trigger such detections.
REST-API request for detecting my-load-carrier1
To trigger the
detect_load_carriersservice via the REST-API, one needs to send a PUT request to the URLhttp://<rc-visard-ip>/api/v2/pipelines/0/nodes/rc_load_carrier/services/detect_load_carriers, where<rc-visard-ip>should be replaced by the actual IP of the rc_visard.The PUT body should include the following data, in JSON:
{
  "args": {
    "pose_frame": "camera",
    "load_carrier_ids": [
        "my-load-carrier1"
    ]
  }
}
The Swagger UI can be reached at
http://<rc-visard-ip>/api, where<rc-visard-ip>is the actual IP of the rc_visard.Under pipeline nodes, select
PUT /pipelines/{pipeline}/nodes/{node}/services/{service}The following values are required to fill the request to the REST-API:
node
rc_load_carrierservice
detect_load_carriers
- service args
The following command assumes that the variable
RC_VISARD_IPis set to the actual IP of the rc_visard (e.g.RC_VISARD_IP=10.0.2.90).curl -X PUT "http://$RC_VISARD_IP/api/v2/pipelines/0/nodes/rc_load_carrier/services/detect_load_carriers" -H "accept: application/json" -H "Content-Type: application/json" -d \ "{ \ \"args\": { \ \"pose_frame\": \"camera\", \ \"load_carrier_ids\": [ \ \"my-load-carrier1\" \ ] \ } \ }"The following command assumes that the variable
RC_VISARD_IPis set to the actual IP of the rc_visard (e.g.set "RC_VISARD_IP=10.0.2.90") and the curl command is in the path.curl.exe -X PUT "http://%RC_VISARD_IP%/api/v2/pipelines/0/nodes/rc_load_carrier/services/detect_load_carriers" -H "accept: application/json" -H "Content-Type: application/json" -d ^ "{ ^ \"args\": { ^ \"pose_frame\": \"camera\", ^ \"load_carrier_ids\": [ ^ \"my-load-carrier1\" ^ ] ^ } ^ }"The following command assumes that the variable
RC_VISARD_IPis set to the actual IP of the rc_visard (e.g.$RC_VISARD_IP="10.0.2.90").Invoke-RestMethod "http://$RC_VISARD_IP/api/v2/pipelines/0/nodes/rc_load_carrier/services/detect_load_carriers" -ContentType 'application/json' -Method Put -Body ' { "args": { "pose_frame": "camera", "load_carrier_ids": [ "my-load-carrier1" ] } }' | ConvertTo-Json -Depth 6
Note
The LoadCarrier module has also the possibility to compute the filling level of a load carrier. This can be done in the Web GUI’s page, by selecting “Filling Level Detection” as Type of Detection in the Try Out section.
Detection results – no matter whether triggered via Web GUI or REST-API – are visualized in the Web GUI’s page. Sample detection results for my-load-carrier1 are shown below. The detected load carrier is colored in blue, while its content is highlighted in green if inside the load carrier and in red if above the rim (overfill).
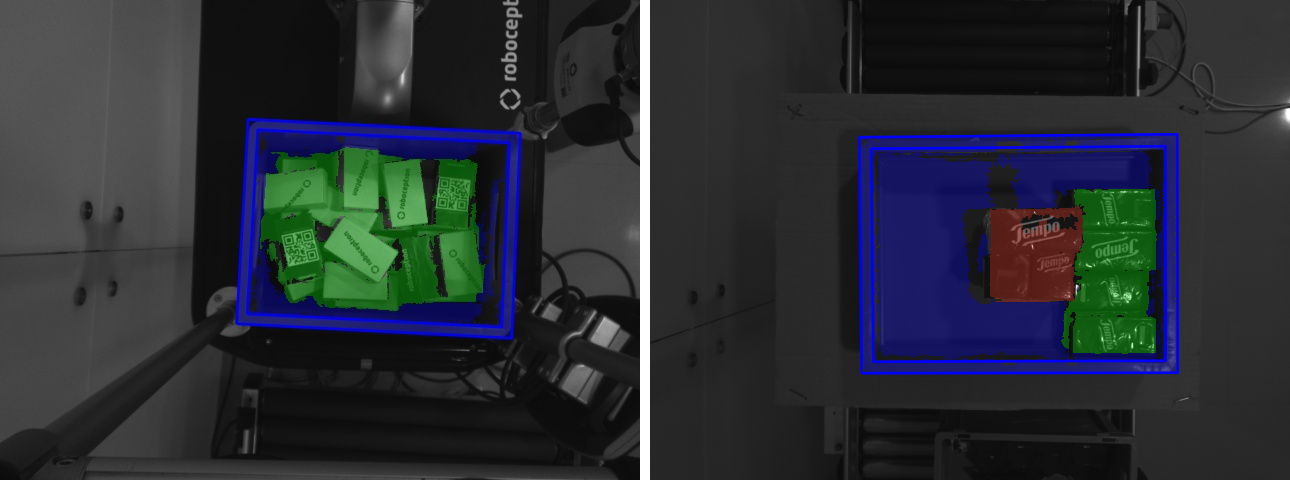
Fig. 16 Detection result for my-load-carrier1 without overfill (left) and with overfill (right).
Note
While the detect_load_carriers service supports a list of load_carrier_ids
as input argument, the current implementation only accepts one load carrier ID
in the list.