Getting started with CollisionCheck
The CollisionCheck module is integrated with the ItemPick modules, with SilhouetteMatch, and with CADMatch, but can also be used as standalone product. In this tutorial we focus on setting the parameters and checking collisions with the ItemPick module.
Warning
Collisions are checked only between the load carrier and the gripper, not
the robot itself, the flange, other objects or the item located in the robot
gripper. Only in combination with SilhouetteMatch or CADMatch and only
in case the selected template contains a collision geometry and
check_collisions_with_matches is enabled in the respective detection
module, also collisions between the gripper and other detected objects are
checked. Collisions with objects that cannot be detected will not be
checked.
Before we start
In order to go through this tutorial, the following prerequisites should be met:
The rc_visard is properly configured:
- The rc_visard is running the latest firmware (version 26.04) and the rc_visard’s license includes the CollisionCheck and ItemPick modules. This can be verified on the page of the Web GUI.
The previous tutorial Setting up the gripper has been completed.
Note
The detection in the tutorial is done with the ItemPick module. To fully recreate it, it is necessary to have the ItemPick module available on the sensor and be able to run the detection as described in Configuring ItemPick for bin picking. However, reading it will give useful insights also for people who use it with other detection modules or as a standalone module.
Checking collisions
Note
To show the results of the CollisionCheck module, we will use the Try Out section of the Web GUI’s page. More details on how to use CollisionCheck with other modules are available in their tutorials and the manual. For using CollisionCheck as a standalone product check the CollisionCheck manual.
After the gripper and the parameters are configured, filtering out the colliding grasps is quite straight forward. In the Try Out section of the Web GUI’s page, define the suction surface length and width corresponding to the real dimensions of the gripper’s suction cup. After that, select the load carrier. Then, enable the Collision Check and select the default gripper as shown in Fig. 53.
After clicking on the Detect Grasp Points button, only the collision-free grasps are returned.
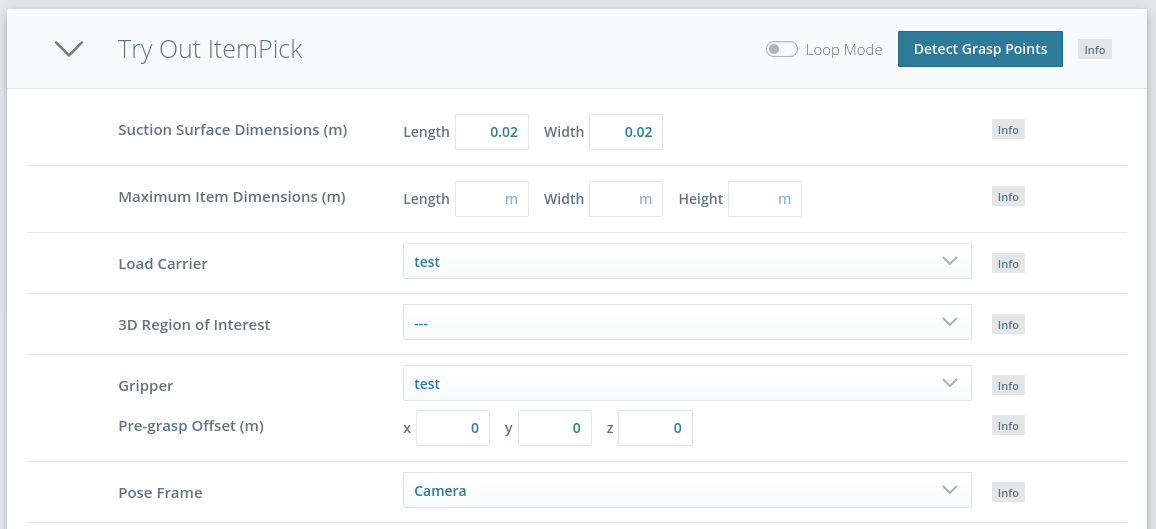
Fig. 53 ItemPick Try Out section
In the visualization images, the colliding grasps are drawn as red points and black ellipses as shown in Fig. 54, but will not be listed in the ‘Result of Grasp Point Detection’ table. To get all detected grasps, users should trigger a new detection without enabling Collision Check.
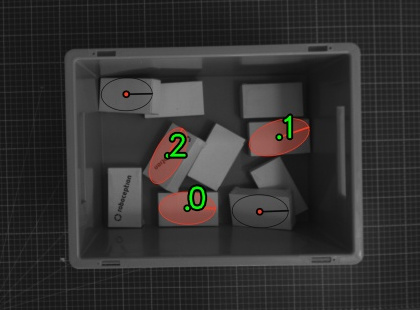
Fig. 54 Grasps on the tilted objects close to the load carrier walls are marked as colliding
Setting a pre-grasp offset
The pre_grasp_offset argument on the Web GUI’s page
can be used for additionally checking if the gripper is in collision with
the load carrier at any point during a linear motion from the pre-grasp position to the grasp position.
The pre-grasp offset is the offset from the grasp position to the pre-grasp position in the grasp’s coordinate frame.
If this value is set to (0,0,0), collisions will only be checked at the grasp points.
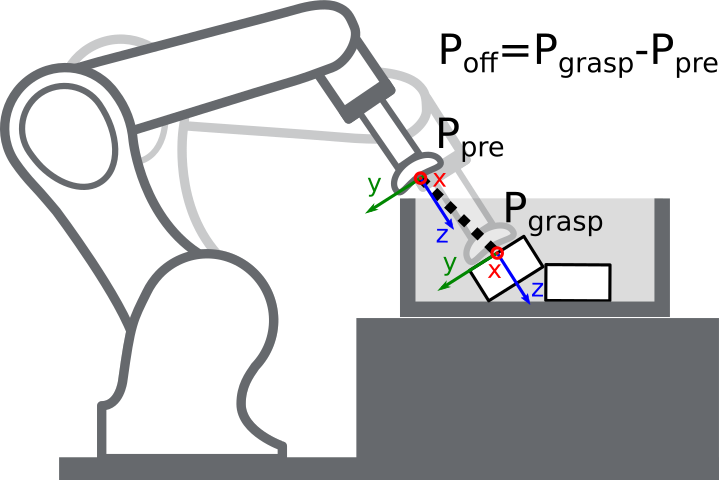
Fig. 55 This grasp would be marked as colliding. The gripper collides with the load carrier during movement from the pre-grasp position to the grasp position.
Configuring parameters
The parameters for collision checking are set in the Web GUI’s page or via the REST-API interface, no matter if the module is used as a standalone product or as a part of any rc_reason module. Details are given in the manual in Parameter overview.
Collision Distance
The
collision_distanceparameter is the minimal distance in meters between any part of the gripper geometry and any of the load carrier’s walls for a grasp to be considered collision free. Fig. 56 visualizes this distance. This parameter should be increased if the module returns valid grasps too close to the load carrier’s walls. If, on the other hand, valid grasps near the load carrier’s walls are rejected, this value should be decreased.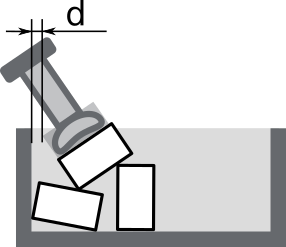
Fig. 56 The minimal distance between the gripper geometry and the load carrier’s walls is \(d\).
Check Flange
The
check_flangeparameter is used to activate an additional safety check to prevent collisions between the load carrier and the robot body. If this check is active, grasps where any part of robot flange is inside the load carrier are marked as colliding. For this functionality to work properly it is necessary to correctly set the flange radius during the gripper creation (see Flange radius).
Fig. 57 Case A would be marked as collision only if
check_flangeis true. Case B is collision free.
Check Bottom
When this check is enabled, the collisions will be checked not only with the side walls of the load carrier but also with its bottom.
If the TCP of the gripper is inside the collision geometry (e.g. for suction cups), it might happen that the grasp points close to the load carrier bottom are marked as colliding. To prevent this from happening, collisions with the load carrier bottom can be disabled by setting the
check_bottomparameter to false. This parameter should only be disabled if it is safe to assume that such collisions will not happen. We do not recommend to switch it off for large grippers that might collide with the bottom of the load carrier when they are tilted.